Like many others, the idle of my AE86 was too high, even when fully warmed up. The engine would idle at slightly above 1000rpm. This wasn’t too bad, but I wanted to fix it. Some countries also test the idle speed during the vehicle checkups and you won’t pass the inspection with a too high idle. According to the Toyota workshop manual, the idle should sit at around 850-900rpm when fully warmed up.
The idle speed of the 4A-GE is controlled by a complex mechanism of vacuum pipes, electronic actuators, and mechanical elements. This is why most of the idle adjustment procedures described in forums or on YouTube videos are either incomplete or plain wrong.
How Does The Idle Adjustment on the AE86 Work?
Idle speed is adjusted by the amount of air that enters the engine when the throttle is fully closed. The amount of air that manages to bypass the closed throttle in the intake directly correlates with the idle speed. If too much air enters the engine, the idle will be too high, too little air, the engine revs too low or stalls.
The amount of idle air depends on the following components.
- Idle switch air valve.
- Idle air control valve.
- Power steering air valve.
- AC idle up control air valve.
- BV valve.
- Idle adjustment screw.
Let’s take a closer look at each one of them.
Power Steering Air Valve
When the power steering is used, it draws power from the engine, resulting in an rpm drop when idling. To counteract, the power steering pump has an air valve that increases idle speed when the pump is under load. The characteristic two tubes running on top of the timing belt cover connect the intake to the power steering pump. If the power steering is used, a small air valve will open, allowing additional air to bypass the throttle, offsetting the engine load caused by the power steering pump.
The rubber hoses on the pipes are usually hardened and cracked, so inspect them first.
AC Idle Up Control Value
Similar to the power steering, the AC puts additional load on the engine when turned on. To offset the load from the compressor compressor, an air valve increases idle airflow when the AC is turned on. On the 4A-GE, this is controlled by an electronic valve located behind the air filter (the valve with a green plug). If engaged, it allows more air to bypass the throttle body, sucking directly from the air filter.
The Problem: Always Opened Idle Air Control Valve
If you have checked all other items, chances are that the main culprit of the high idle is a worn out idle air control value. It is a mechanical device that allows additional air into the engine while cold, and gradually reduces idle air while the engine is warming up. It fully closes when the engine is fully warmed up.
Back in the 80s, manufacturers experimented with many methods of increasing cold idle, and most of them where prone to failure. For example, the Nissan CA18DE uses an electrically heated bi-metal strip, that closes an air valve when heated electrically. These things stop working when the metal strip ages and deforms.
The idle air control valve used on the 4A-GE is an even less reliable design that uses wax embedded in the coolant circuit. Once coolant heats up, the wax expands, and via a mechanism of rods and springs, closes an air gap. The problem is that the wax ages and looses flexibility, causing the idle valve to be stuck open, even after the engine is fully warmed up. Additional air is fed to the engine, causing high idle.
From my experience, almost all 4A-GEs suffer from this problem, as the wax inside these idle air adjustment valves is now 40 years old.
How About Idle Air Blocking Plates?
A seemingly simple solution is to remove the IACV, and simply put a blocking plate in it’s place. The advantage is you have removed the permanently open IACV. The drawback is that you have removed the IACV.
You will have all kinds of annoying issues – engine stalling while cold, having to hold the revs manually while cold, and maybe even stalling when using the power steering or AC. It removes complexity from the engine, but Toyota installed this part for a reason.
How About Electronically Controlled Air Valves?
The only reliable idle control adjustment method that stood the test of time is electronic: the ECU reads the coolant temperature and controls an electric motor that opens or closes the air valve. This is how Nissan solved the idle air control on the low-cost E16i engines in the Nissan Sunny, and it never fails.
For the 4A-GE, it is difficult to retrofit an electronic idle control, because the ECU is not programmed for it. You would need an electric air valve and software that controls it.The factory 4A-GE ECU doesn’t support this, so you either need to go aftermarket, or build an own control circuit.
While I think this would be the best and most reliable solution for a stable idle, I haven’t investigated this yet. I found a guy who managed to install an electric air control valve using a custom CNCed adapter plate, but he uses an aftermarket ECU. Most drivers don’t want to spend a lot of money on aftermarket ECUs. A budget solution would be a cheap STM32 microcontroller plus perhaps a 3D printed case with actuators, but I haven’t tried this yet.
To retain the factory look of the engine, let’s try to repair the IACV.
Testing the Idle Control Valve
Note: This section only works for the JDM 4A-GE engines that don’t use an air flow meter.
You can test the idle control valve by warming the engine up, and removing the air filter assembly. Start the engine. Put your finger on the hole in bottom of the throttle body. If you can feel suction and the engine rpm drops, you have proven that the idle air control value is not closing properly. It may feel a bit scary, but don’t worry, the engine won’t swallow your hand.
If you can feel vacuum, and you close the hole with your hands, engine rpm should drop considerably, and give you the correct engine idle.
In Most Cases, The Valve Is Always Open
Most resources on the internet just advise to clean the idle air control valve, which is not a bad idea but usually does not resolve the issue with the aged wax. To fix this properly, you need to open the valve entirely, and adjust it. The good news is that it is can be fixed, the bad news is that you likely need a special tool for it.

Adjust The Idle Control Valve
After removing the idle control valve from your intake (remove the four PH2 bolts. Make sure you have a new gasket for it before disassembling. They are no longer available at Toyota), open the large metal cover plate. It is only glued in place, and you should be able to lift it out by using an Allen key, insert it to the inside of the air valve, and then hammer it out. If the glue is stubborn, you can also drill a small hole, thread it, and use a screw to pull it out. Be careful to not drill to deep, below is a plastic part that you don’t want to damage.
After opening comes the challenging part. The air valve used a spring loaded plastic cone that gets pressed into a metal washer with a center hole. The position of the washer can be adjusted: if you screw it in (clockwise) the air valve will close sooner, if you turn it counterclockwise, the valve will open later. If the valve is stuck open, you need to close the washer a bit more, so that the wax needs to travel less to fully close the air valve. You are basically adjusting the valve to the changed properties of the aged wax.
Now the problem is they this washer is glued in place, and there is no standard tool to open it.

You will need a lot of force to break it open. I didn’t have a suitable tool to adjust the washer, so I drilled two 5mm holes in the washer, and used my largest locking ring pliers. I locked the pliers into a vise, insert the air valve upside down, and then using all my strength to turn the air valve.
I ended up breaking two pliers, scratching the nut and air valve cylinder, and bending the third pliers. This washer is tight!

Eventually, I resorted to the gas burner bottle and heated the case of the valve for just a few seconds (until it started smoking). For me, this did the trick, and I managed to break the washer loose.
This is probably not a good idea for the already aged wax, but in my case it was a last resort. I thought I already ruined the valve and that there was not much left to lose. The washer was scratched, and it looked real messy.
I had to heat it up a few times until I was able to remove the washer entirely. Afterwards, after cleaning the threads, you should be able to install and turn it by hand. The remaining steps are easy.

If you had to drill the washer, use epoxy to seal the drilled holes. Make sure that the seating area of the plastic cone is clean and smooth. If you have damaged it during disassembling, use a file or a Dremel tool to smoothen it again.
Boil the air valve at about 80-90°C, and insert the washer so that the valve is just closed. You can blow in the air opening on one side, hold all the bypass tubes closed, and you shouldn’t be able to get any air across. When installing, ensure correct order: the stiff spring goes between wax element and cone, and the soft spring between cone and washer. You need to do this at operating temperature, so that you maximize the valve opening when cold, and ensure the additional idle slowly decreases as the engine warms up. If your valve closes too early, your engine may run too low when cold. I adjusted the valve at 70°C, which was not enough. My engine still stalls occasionally when cold. Use every mm of travel you can get out of the worn out wax. You want to get as much additional air into the engine when cold, while still ensuring the valve closes fully at operating temperature.

Let the valve cool down and ensure that at room temperature, you can blow air across the valve without restriction. If you managed to do this successfully, congratulations, you have just repaired your first idle air control valve!
Use Loctite or similar to secure the washer in place, and reinstall the cover plate. Use engine sealer or similar to make sure it’s airtight. After removing the old gasket residue, install the air valve with a new O ring and new gasket. Connect all air and coolant hoses, and top up the coolant.
Start the engine, allow it to warm up. You can verify correct operation as described above (remove the air filter, and close the hole for the air valve). After warming up, there should no longer be any suction on the auxiliary air valve opening in front of the throttle body.
If all components are confirmed to be in good working order, you can do the final adjustment of the idle speed by adjusting the idle adjustment screw on the throttle body (the large flathead screw). With the air valve now working correctly, the engine should stall when closing the valve completely.
Open the screw so that engine rpm is within 850+-50rpm when warmed up.
After your engine idle is correct, it may be a good idea to verify the ignition timing. With idle being too high, chances are high that the ignition timing was adjusted incorrectly previously: the timings are different if the engine is at 850rpm, or at 1100rpm.
Note: this is not a “repair”. The wax material has aged, and this procedure merely minimizes the effect and restores correct operation after warming up. Because the lift of the wax is reduced, your cold idle will be too low, but hopefully not too low to cause the engine to stall.
Building a Proper Tool to Open the Adjusting Washer
Readjusting the idle air valve is not too difficult except opening the super tight adjustment washer. Having the correct tool that fits into the 8 small noses in the washer would greatly simplify the task. I found a drawing for a tool that should work, but you’ll need to have a lathe to build it. Perhaps give your friend at the machine shop a call before attempting the rebuild?
Update 2026-02-22: Gazoo Racing Is Developing A Repair Kit
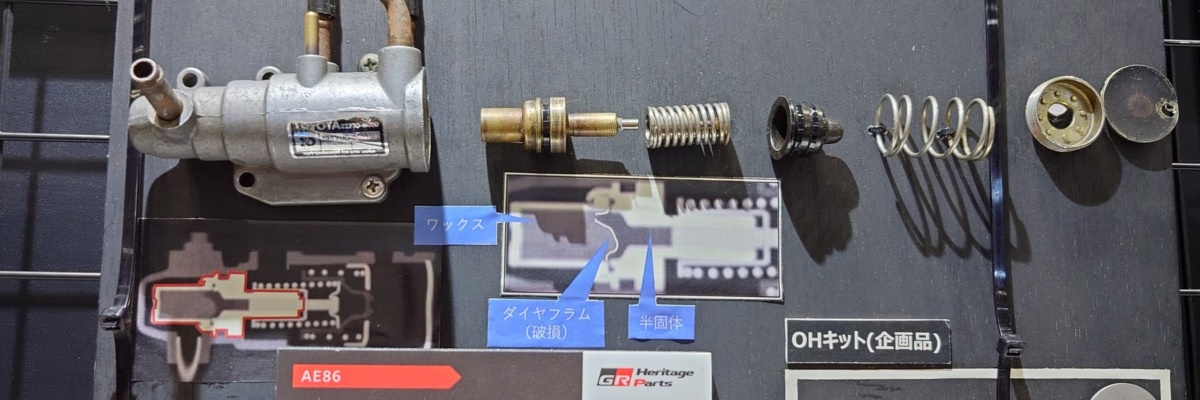
Today, I visited the Nostalgic2Days event in Yokohama, and had a look at the Gazoo Racing Heritage Parts section. They are developing a repair kit for the 4A-GE idle air control valve!
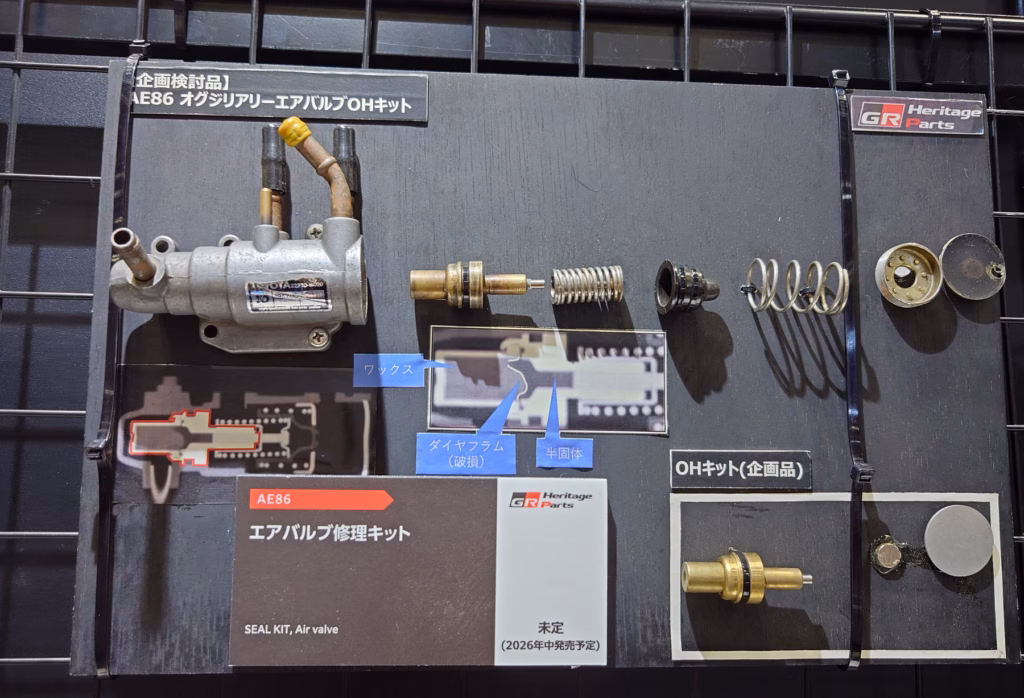
To explain the Japanese drawings, on the upper side, you can see an explosion view of the air control valve. The diagram shows the wax, diaphragm, and semi-solid (from left to right). On the bottom right corner, you can see the planned parts of the overhaul (OH) kit. It will include a new wax assembly and a new cover for the air valve (in case you had to drill it open).
This is great news, and should resolve the idling issues on our beloved AE86s. In fact, my readjusted air valve shows again signs of misalignment, as the idle is again slightly too high. Instead of trying to readjust it again, the next time I will just replace the wax part. The only thing I wonder is – will they provide a tool to open that nasty washer?
